How to Start a Blog and Make Money Blogging in the UK
Table of Contents
Want to learn how to start a blog in the UK and make money blogging and build a personal website step by step?
Then you are on the right web page where you can learn how to write a blog post from scratch with SEO. As the UK’s best web host we help people in the UK get online with their own WordPress blog every single day.
Before you start Blogging
In this guide, I will show you the complete steps involved in starting a new blog and if you are new to the blogging field, then you can simply go through this guide and you can learn easily.
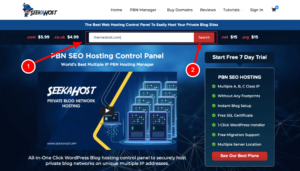
Exploring the world of blogging is an exciting journey, especially when it comes to unleashing the potential for online earnings. The misconception that coding or technical expertise is a prerequisite for starting a blog is unequivocally debunked – it’s a resounding NO. Thanks to SeekaHost.app, the process is streamlined, allowing you to launch your first blog within mere minutes using the user-friendly SeekaHost self-hosting WordPress hosting panel.
The simplicity extends even further with the SeekaHost.app portal, which boasts a meticulously crafted control panel acclaimed as the world’s best for WordPress sites. Building your blogging site on the renowned #1 platform globally has never been more accessible. With millions initiating their self-hosted WordPress blogs, now is your moment to grasp every facet of the process.
Commencing a blog marks the initial stride towards an online presence and the potential development of a lucrative blogging career. Who knows, you might even ascend to the ranks of the top business bloggers in the United Kingdom.
To further fuel your aspirations, take a moment to explore Google for “top bloggers” and “UK bloggers.” Delve into the curated list to glean insights into their blogs’ aesthetics and gather inspiration for your unique creation.
In this comprehensive guide, I will meticulously walk you through the step-by-step process of inaugurating your blog. If you find yourself navigating the blogging realm for the first time, rest assured that this guide is tailored to facilitate a seamless learning experience.
What is Blogging?
Blogging presents a straightforward method for sharing textual content, and multimedia elements like images, infographics, and videos on the internet, focusing on a particular niche and making it accessible to a wide audience. While there are numerous platforms for initiating a blog, opting for the WordPress Content Management System (CMS) stands out as the optimal choice due to its user-friendly interface and SEO-friendly features.
Advantages of being a Blogger
Embracing the lifestyle of a blogger comes with a myriad of perks. Foremost, the beauty lies in the absence of a rigid office schedule or the necessity to work from a fixed location. Armed with just a laptop and a reliable internet connection, the world becomes your workplace, granting you the freedom to blog virtually anywhere.
The convenience extends to the minimal investment required for blogging.
View this post on Instagram
Essentially, the costs are confined to obtaining a domain name and securing web hosting, both of which come at an affordable rate through the SeekaHost App. The financial commitment is notably low, making blogging an accessible venture for many.
The key to success lies in unwavering consistency. Whether you’re nestled in your cosy spot or exploring new horizons, dedicating daily time to your niche is paramount. By consistently churning out fresh, informative, and unique content on your website, you pave the way for a fulfilling and flexible blogging lifestyle.
My Blogging story in the UK
First things first, let me introduce myself my name is Fernando Raymond and I started my very first blog back in 2013 and it was on WordPress. I blogged about online business, and SEO services and that led me to learn blogging skills to help my online business, as well as help business owners, gain traffic to their blogs. I created hundreds of blogs and after my first digital agency, ClickDo I started a hosting company, SeekaHost to help millions of people get online with domain names and self-hosting websites.
So I have over 10 years of blogging experience doing it almost every day.
I write for my personal blog www.fernandoraymond.com/blog/ and write for SeekaHost blogs and many others.
I and my team have helped many people in the UK with how to start and what to consider and in this guide, I will be showing you how to buy a domain, set up hosting, set up your WordPress website and finally do some on-page SEO that will help with getting your blog launched.
I have also created several SEO and blogging courses at the SeekaHost University, in case you are looking for a deeper dive into the subject.
There will be instructional videos on how each of these stages is done. I have recorded my screen so you can follow my step-by-step detailed guide while even building your own blog set-up.
What is a Blog?

start a blog
Now that I’ve given you a glimpse into who I am as a blogger, let’s delve into the essence of a blog. A blog serves as a unique space on the vast internet landscape, providing individuals with the platform to express their opinions, create a global impact, or even kickstart their business venture.
It’s a digital realm where you can authentically be yourself, free from judgement—a canvas you design and shape using your instincts. While the fundamental concept of blogs has endured, the surrounding industry has evolved, becoming both more straightforward and intricately layered.
This evolution, however, has posed challenges, particularly for the average person aiming to elevate their website’s ranking without a budget comparable to Trump’s presidential campaign. Why is this the case? The expenses associated with content creation, web hosting, link building, and various other components can swiftly deplete your bank account.
But fear not, as there are ways to trim costs, such as taking on content creation, managing your on-page SEO, or even spearheading outreach efforts for link building. Although the expenses tied to blog ranking can accumulate rapidly, don’t let it discourage you. With the right knowledge, you can steer your blog towards success relatively swiftly.
Why you Should Start a Blog in the UK?
Well, the reasons could be numerous from creating a brand and getting a passive income, to getting your info out about your practice or lawyer experience and getting more clients to the door. You might want to just write about your life and experiences or even a fan page about your dog.
The possibilities are only limited to your imagination, and besides having a blog is a great way of getting into the internet spirit and building your online image and establishing your brand.

Creating a blog is also a great way of expanding your horizons. You get to meet likeminded people and anyone looking for a service you may offer can find background information about you.
There are numerous reasons to create a blog but the main reason should be for yourself and not for profit or fame, we all need to try and create a better internet.
What is Needed to Create a Blog?
To learn more about remote working opportunities you can check the below video by content creator and blogger James at SeekaHost:
Expanding your horizons is another notable benefit of blogging. By connecting with like-minded individuals and offering background information about your services, you open doors to potential clients and collaborators. While there are myriad reasons to create a blog, the primary motivation should be personal fulfilment rather than solely chasing profit or fame. The collective effort to contribute positively to the internet should be a driving force.
As for the essentials needed to create a blog, the requirements are quite basic—just a steady internet connection and a decent computer. Depending on your goals, creating a blog can be cost-free, although a more serious approach might involve purchasing paid hosting and domain names, with costs varying based on the chosen quality of hosting.
The journey begins with the most basic options and progresses to more advanced setups for those seeking additional functionality. Custom domains on shared hosting provide a budget-friendly approach but may come with limitations, especially in terms of security and potential impact from other hosted websites.
For a more robust setup, opting for a new domain with premium hosting on dedicated servers is a substantial leap. This is ideal for building a stable brand, offering ample bandwidth, and providing essential features for search engine optimization.
Advanced developers or brand builders might explore the option of a dropped or expired domain—seeking domains with previous use, benefiting from old links and domain age. While this is an advanced method, it’s not recommended for newcomers to the blogging scene.
What Blogging Platform Should You Choose?
When it comes to choosing a blogging platform, WordPress reigns supreme, powering a significant chunk of the web. While other platforms exist, none come close to the prevalence and versatility of WordPress. HTML, though a raw code option, is largely impractical for those without extensive coding knowledge or deep pockets.
Premium WordPress from WordPress.org is hailed for its features, user-friendly dashboard, and flexibility. WordPress.com, the free self-hosted version, is a viable option for budget-conscious bloggers but comes with limitations on monetization potential. Other platforms like Blogger offer a free but less stable experience, while Wix is quick and easy to set up, albeit with limited flexibility in changing website templates once chosen.
In essence, the choice of a blogging platform depends on your specific needs and preferences. Each option has its pros and cons, and understanding them will guide you toward creating a blog that aligns with your goals.
The SeekaHost Team compare Wix vs WordPress in this clip:
How to Create Your Blog via SeekaHost.app
View this post on Instagram
Starting a new blog from the scratch is not a complicated task at all. It’s so simple and below are the complete steps involved in the creation of the new blogging website.
- Choosing the domain name
- Domain name registration at SeekaHost App
- Buying the web hosting at SeekaHost App
- Creating your WordPress website in SeekaHost App
- Updating the nameservers
- Activating the SSL
- Boom – your website is live! – Ready to publish the first post.
1. Choosing the domain name
A domain name is nothing but the name of your website. For example, www.seekahost.co.uk, In this the domain name is SeekaHost and the domain extension is .app.
So the first job you need to do to start a new blog is choosing a domain name. When choosing a domain name, you need to make sure that it passes certain factors. So it will perform well on Google Search and also in other search engines.
Below are some of the important parameters to which you need to give importance while choosing the new domain name for your blogging website.
- Always try to choose the domain name relevant to your blogging niche. For example, if you are planning to start a blog related to cooking. Then the domain name can be like, cookingtips.com or something like that. Having the domain name relevant to the niche you are choosing is always an added advantage in blogging as it will help Google and other search engines to understand your website in a better way.
- Try to choose short domain names rather than long URLs. Having a short domain is an added advantage.
- Choose the domain extension based on the country which you are going to target. For example, if you are planning to target the UK, have the domain extension as .co.uk or If you are going to target India, have the domain extension as .co.in. But to start a blog, it’s always recommended to go globally and you can choose the .com domain extension for that.
- If you are planning to choose an expired domain to build your blog, make sure that the domain is free from spam scores or bad backlinks.
- If you are lucky enough to find a great expired domain for your niche, it’s an added advantage in Blogging as Manuela explains in this SeekaHost podcast:
You can buy the domain names for the very best price at SeekaHost App when compared to the other domain name providers in the UK.
2. Domain Name Registration at SeekaHost.app
So first step of Blogging is to choose the domain name. Once you have finalized the domain name, then check whether the name is available to register and then register it.
Now in this step, I will show you how to register your domain name using the SeekaHost App at a very cheap price.
The first thing you need to do is visit the SeekaHost.app web application – www.seekahost.app and “Create an Account” for you on the website.
Once you have created an account, you can log in to your account and get started.
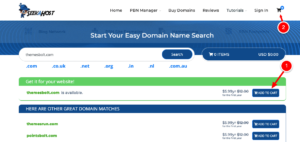
After logging in, the first thing you need to do is search for the domain name which you have previously selected in the search box available on the website (Check below image)
If your domain name is available, then you will see the “Available” message as shown below and now you can click on “Add to Cart” for the selected domain name.
In the next step, click on the “Checkout” option and proceed further.
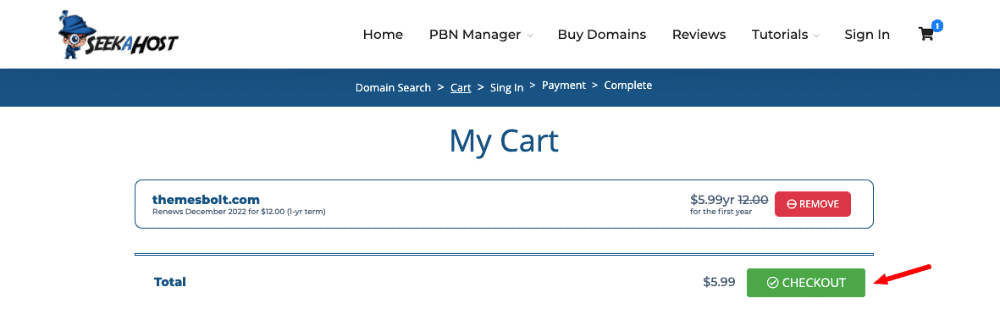
In the next step, it will ask for some basic information to be filled in about you and once that is done, you can click on “Continue Shopping” as shown in the below image.

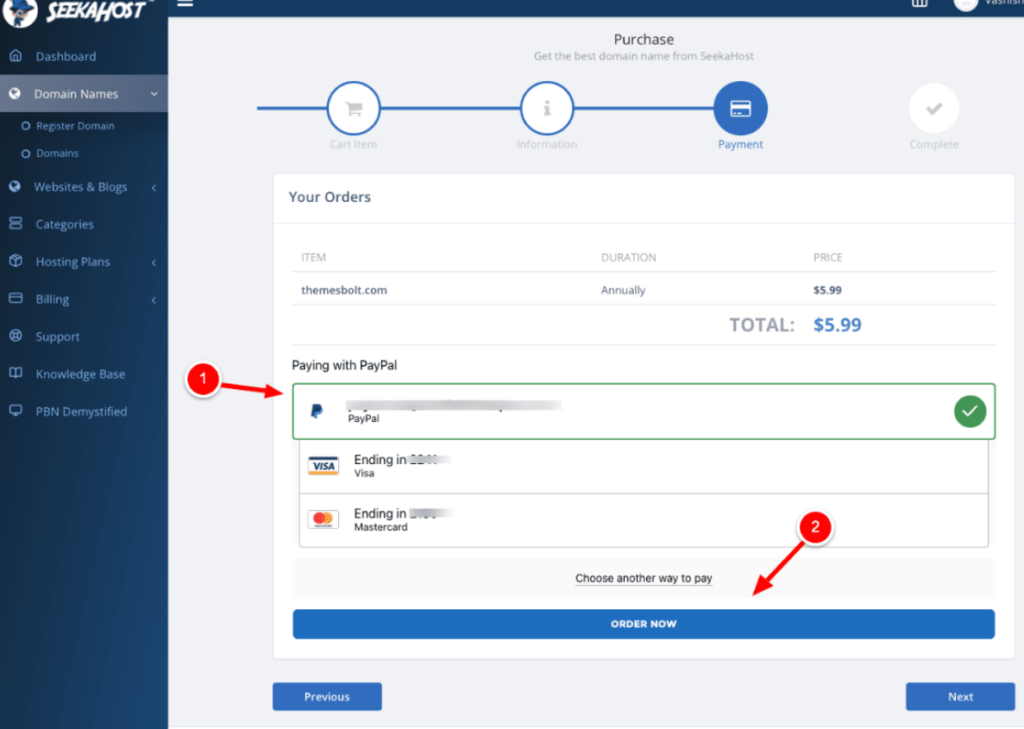
Now you are in the final step, in the next step, it will ask for the payment methods. You can select your preferred payment method as shown in the below image and proceed with the payment by clicking on “Order Now”
Now you have purchased your domain name the domain name will be activated for you under your profile for you to access it.
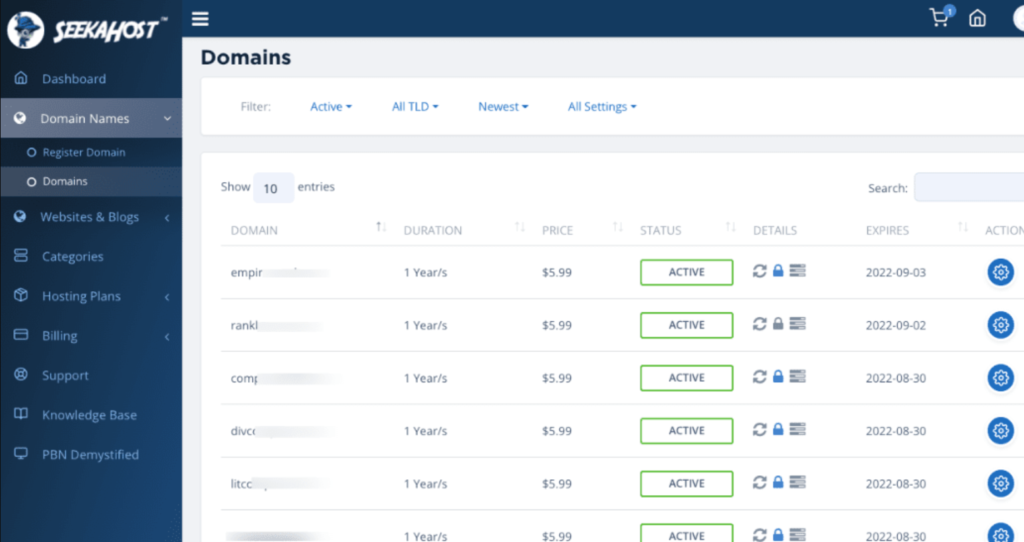
Now you will find the new domain name which you have registered in the “Domains” section under the “Domain Names” option in the left sidebar,
So now the first step is completed and you have successfully registered the domain name.
3. Buying the Web Hosting for the Blog
Now after registering the domain name, the next step is to buy any web hosting plan get your domain hosted on the servers and make it live.
View this post on Instagram
As I have registered the domain name previously in the SeekaHost App, Now I am going to buy the web hosting at the same place. It’s always best to have the domain name and the web hosting at the same place as it’s easy to manage.
SeekaHost App is the best platform that helps you manage both the domain names and the web hosting in one dashboard.
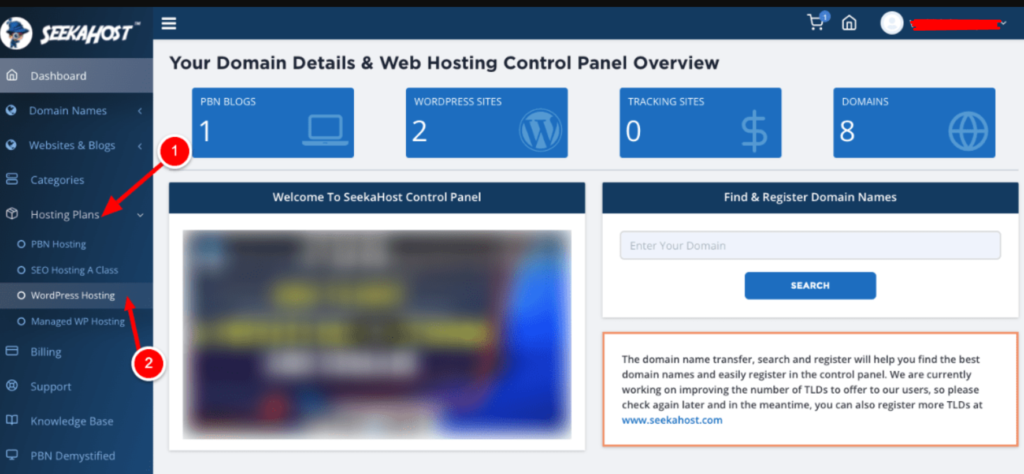
Now to buy the hosting, simply log in to your account on the SeekaHost App and Select “WordPress Hosting” under “Hosting Plans” as shown in the below image,
Since I am going to host only one website, I am going to buy a single WordPress website hosting plan. But in case if you are planning to host more than one website or multiple websites then you can choose the hosting plan based on your requirements.
The below image shows some of the available WordPress hosting plans available in the SeekaHost.app.

When compared to the other web-hosting providers, SeekaHost offers the best WordPress hosting plans at the best and cheap price via the seekahost.app as well.
Now select the plan and click on “Choose Plan” as shown in the above image.
In the next step, it will prompt for the Payment method and you can proceed with the payment by choosing the preferred payment method.
Now, that this is done, you have registered a new domain name and also have bought a web hosting plan using SeekaHost.app portal.
4. Building your WordPress Blogsite
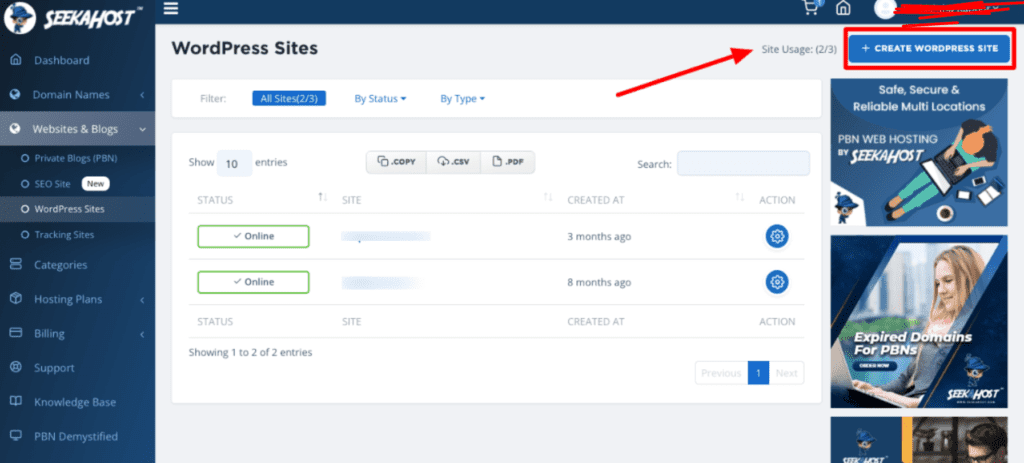
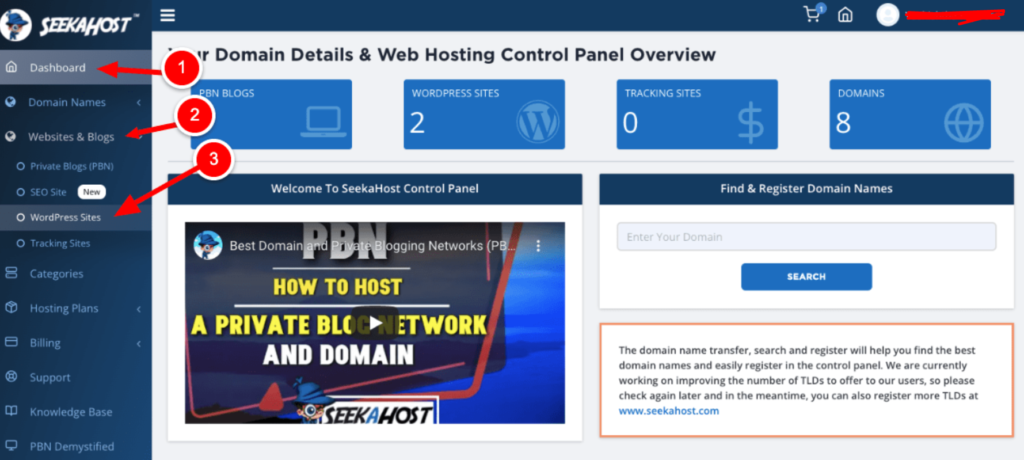
Login to your account on the SeekaHost App normally and select “Website & blogs” and under that select “WordPress sites” as shown in the image below.

After selecting this, click on the “Create WordPress Site” button as shown below.
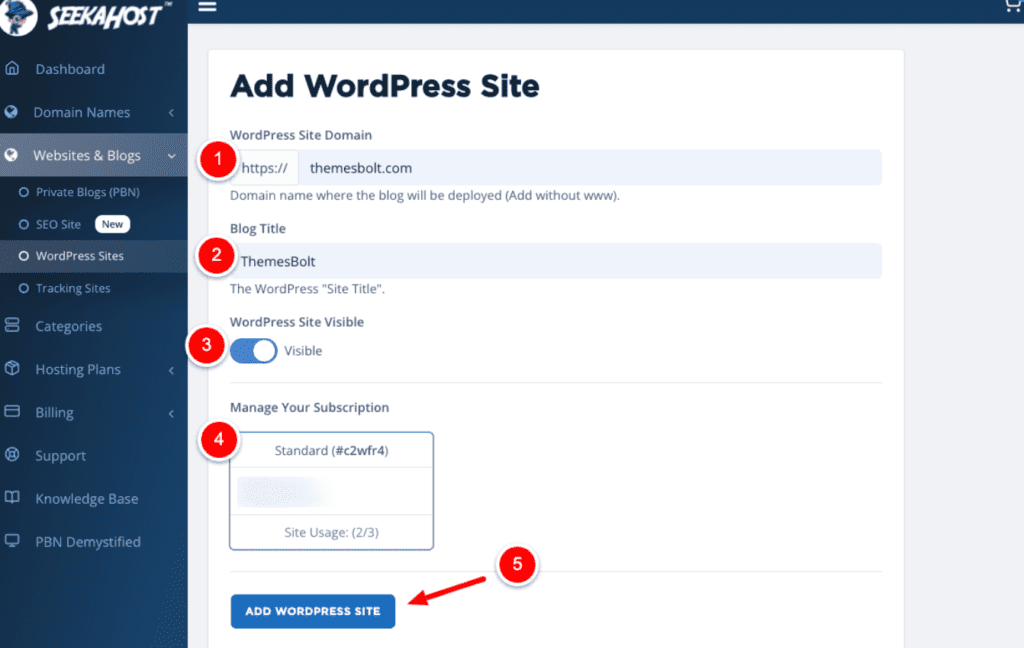
In the next step, enter the name for the Blog and other basic details as shown in the below image and click on “Add WordPress Site”
Now you have added WordPress to your domain name using the SeekaHost App. Now within minutes of time, WordPress will be installed to your domain name and the login details will be sent to you through your registered email ID from SeekaHost.
View this post on Instagram
You can use the login details which is mentioned in the email and log in to your Blogsite. Later you can also reset the password based on your convenience. But wait, still, one more step is there.
Before logging in to your website for the very first time, you need to update the nameservers. Now I will show you how to update the nameservers and why it needs to be updated.
5. Updating the Nameservers
p style=”text-align: center;”>
To make your website live on Google and accessed by the users, still, one more step is pending which is nameserver updates. You need to update the nameservers and point the domain to the nameservers of SeekaHost where the website is hosted.
Now the list of sites that you have hosted will be listed here as shown in the below image.
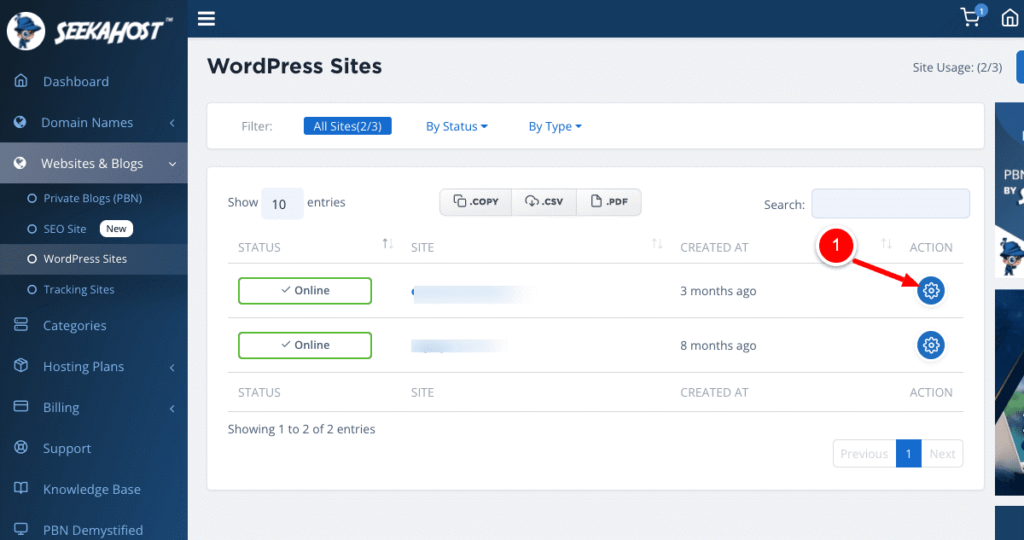
Now click on the “Settings” icon which is available next to the domain name which you have hosted as in the above image.
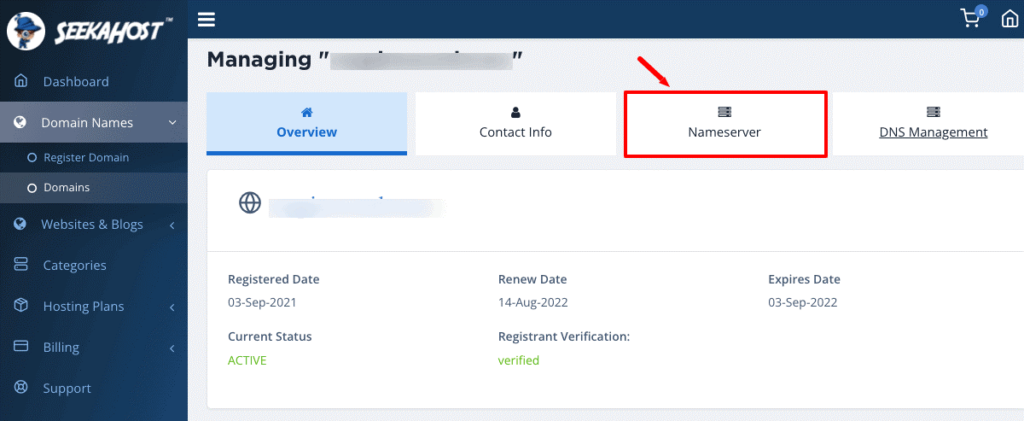
Now the nameservers of the respective domain will be listed as shown in the below image and you need to copy that and should update the same in the domain name where it is registered.

Click on the Nameservers tab as shown in the below image to get into the Nameservers section.
Now select the “Use Default Nameservers” option as shown in the below image and paste the nameservers which you have copied earlier and click on “Change Nameservers”
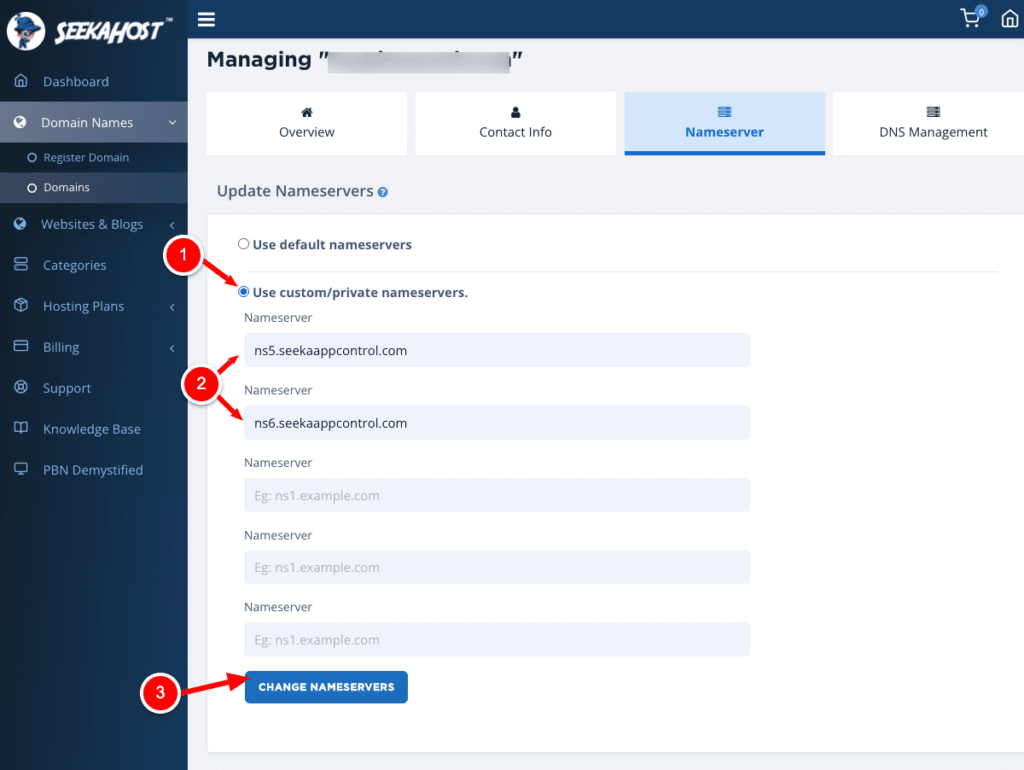
Now the nameservers update is completed and will take some time for the nameservers to get updated in the domain registrars. Now your website should be live once the nameservers are updated properly.
6. Enabling the SSL Certificate
Now, this is the final step in website creation. You need to enable the SSL certificate to make your website load in the HTTPS version.
So this is the common question that anyone who creates a blog for the first time will have in mind. Here is the answer, SSL called the Secure Sockets Layer is the security protocol that protects the communication which is happening between the user computer and the webserver.
For instance, if you are entering any online shopping site and buying some product. Then you will enter your card details to make the payment, In that case, your card details will be passed on to the web server from your computer and then the response will be received from the server to process the payment.
So while this communication is happening between the user’s computer and the webserver, having SSL will help you to protect this communication from third-party software and other stuff.
It doesn’t mean that SSL is only for the website where the money transaction is happening. SSL is a must for all kinds of websites.
You can easily enable the SSL for your website using the SeekaHost.app with a single click. Now I will show you how to activate the SSL for your website in SeekaHost App.
Now click on the “Websites & Blogs” option on the left side and select the “WordPress Sites” option. Now select the settings icon which is near your website name as shown in the below image.

Select the “SSL” option which is on the right and enable the SSL.
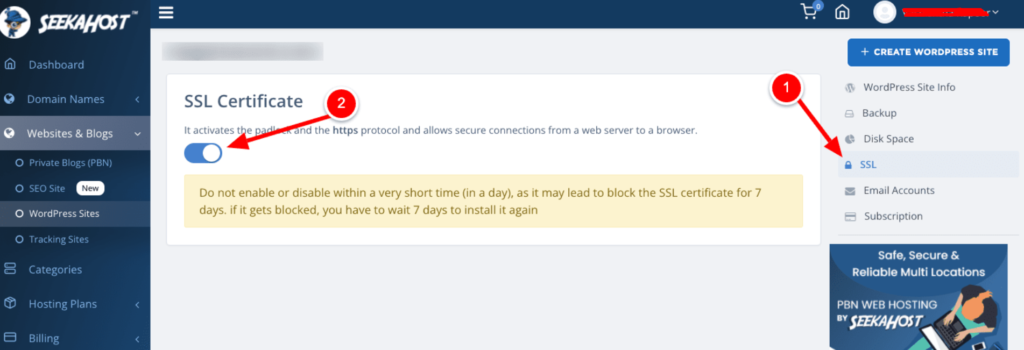
Now the SSL is activated in the new website which I have created now. Now all the process involved in the website creation is completed and the website is live on the Internet.
7. Publishing the first post on the Blog
Now the process is so simple that you have learnt how to register a new domain and get it live on Google. Now I will show you how to publish your first post on the website and make it available for your audience.
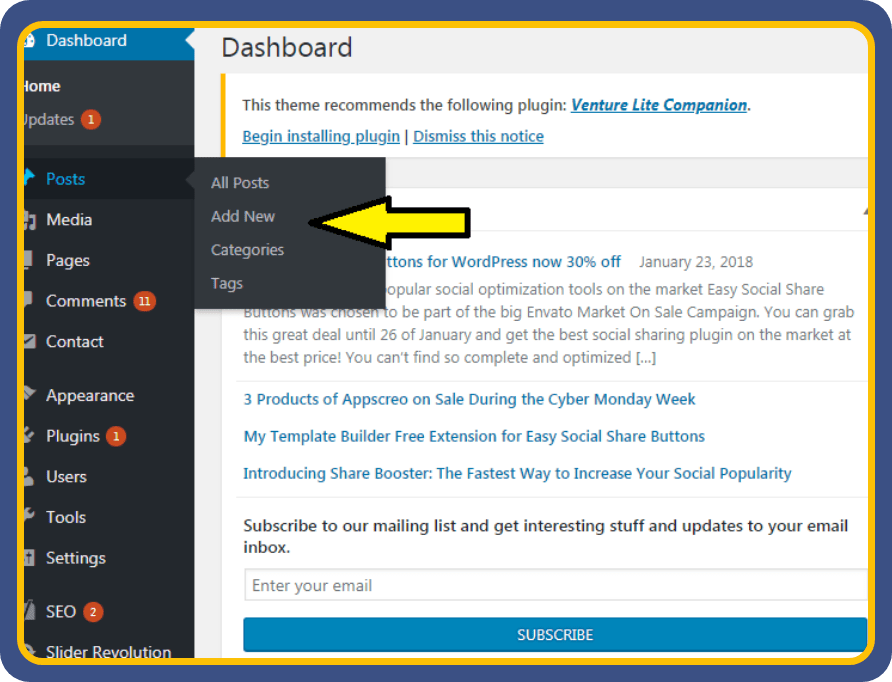
You can login to your website with the details which was mailed to you by SeekaHost App. After logging in, select the “Add New” under the “Posts” section as shown in the below image.
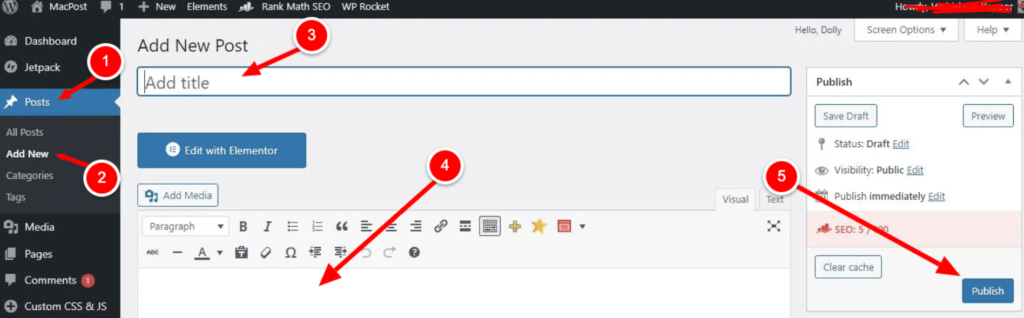
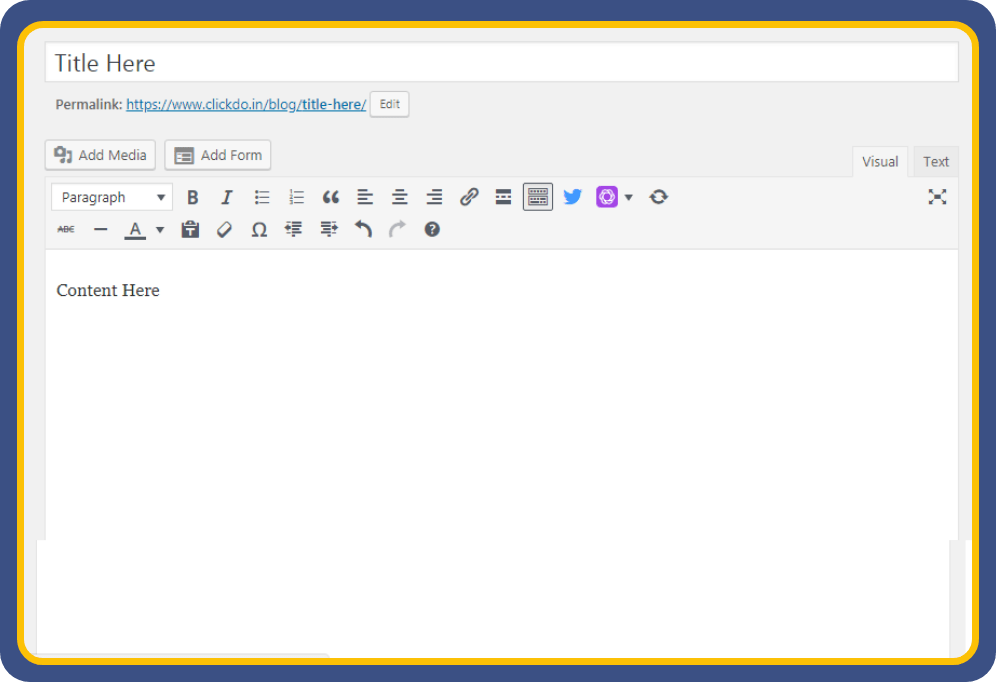
The WordPress text editor is so simple to use. You can easily add the title in the respective section as shown and add the content in the below text area.
You can add media files like images, infographics and can also embed the videos from YouTube directly to WordPress.
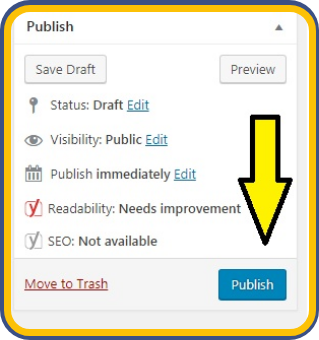
Once you have completed adding all the relevant content, you can click on the “Publish” option which is available on the right side. That’s it, Now your post will be live on the website and can be accessed by any normal users on the web.
This is so simple to create a new website and publish your first post using the SeekaHost App.
Basic Plugins to be installed on a new website:
- W3 Total Cache
- All In One SEO / Yoast SEO
- Smush It
- Really Simple SSL
- Wordfence Security
- Stream
- All in One WP Migration
W3 Total Cache:

Optimizing the website speed will help you to rank well on Google. It is a complex task when it comes to page speed optimization, especially on the coded website. But no need to worry here, as this is a custom-designed website using WordPress. Installing the W3 Total Cache plugin will create a cache on the user’s browser when he visits the site for the first time. When the user tries to visit your site next time, it will be loaded from your web browser, instead of loading from the web server.
All In One SEO / Yoast SEO:
The main objective of starting a blog is to rank on Google’s first page and get more traffic to the website through that. Here these plugins will help you out in doing the On-Page SEO in a simple and easy way.
All in One SEO plugin will help you to optimize the sites more easily and also help you to provide a Title tag, Meta Description, etc to the Blog post. All in One SEO pack is very much suitable for all beginners in SEO.
Yoast SEO plugin is similar to the All in SEO Plugin. It offers the same features as like All in One SEO plugin. Compared to that, Yoast is even more technical and it helps you to optimize the content for better user readability and with many more options.
Smush It:

Image optimization helps you to increase the website loading speed on both mobile and desktop devices. Hence use the smush it plugin to optimize the images on the site and also increase the website loading speed.
This plugin helps you to optimize the images without reducing the quality of the pictures. As Google started giving more priority to the websites with good loading speed. Use the Smush it plugin and get ranked higher on Google.
Wordfence Security:
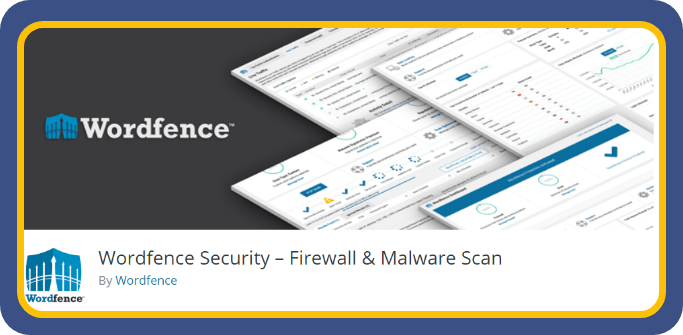
This is a much-needed security plugin for all your websites. Wordfence acts as an endpoint firewall and malware scanner that was built most importantly to protect WordPress websites. Wordfence security blocks malware, malicious IPs and inappropriate attacks on your WordPress website. Hence this plugin is a must for all websites that have WordPress as a backend.
Stream:

When your’s is a blogging site and if many bloggers have access to your website to post the content. Then you can monitor their activity inside the WordPress dashboard by having the Stream plugin installed. Stream plugin will monitor each and every activity that is done by the user after the login and it will have all the data. This plugin helps you keep track of all the activities under control. Even if some issue occurs in the future, you can sort it out in a simple by having the stream plugin installed.
All in One WP Migration:
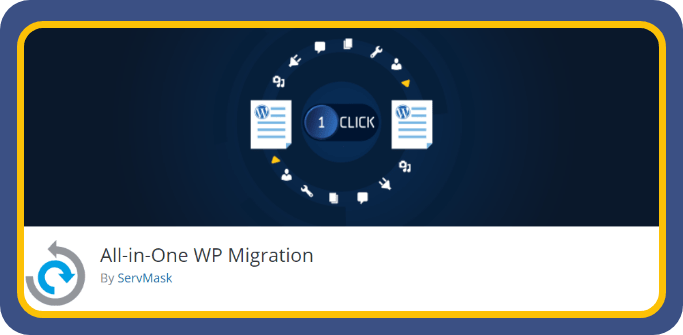
All in One WP migration will be needed when you try to migrate the site. With this plugin, you can export your website including the database, media files, plugins and even themes. The main advantage of the All in One WP migration is that it does not require any technical knowledge to work with it. With the help of this plugin, you can just drag and drop the WordPress site into any location.
Google Analytics Integration
Google Analytics is the free web analytics tool offered by the users to track the performance of their sites. By using Google Analytics you can have the entire data about your website like from where the users are coming, traffic, the source of traffic, bounce rate and so on.
You can even use the Google Analytics tool and compare the traffic of your own website over the past days.
Step By Step Guide For Google Analytics Integration:
- To incorporate Google Analytics into your website, it’s essential to have a Google account. If you don’t have one, create an account and sign in.
- Visit google.com/analytics and click on the sign-in option. Enter your email address and password to access your account.
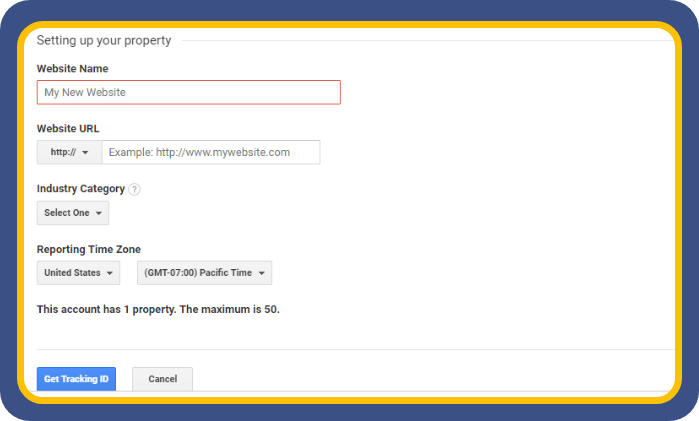
- Upon signing in, proceed to set up your Property on the dashboard. Under the property column, opt for “New Property” and select “Website.” Enter the website URL in the subsequent step.
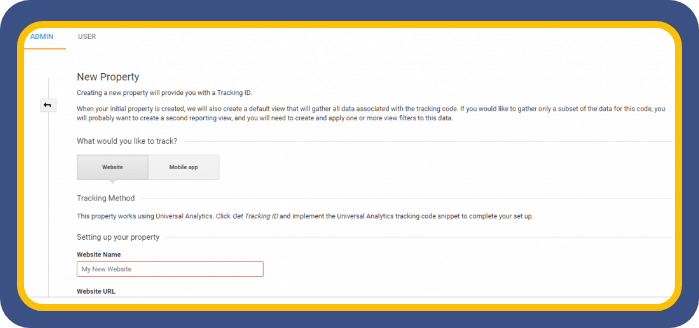
- Choose the industry category and set the reporting time zone in the next step, and then acquire the Tracking ID.
- To ensure that Google Analytics collects all website data, integrate the Tracking ID with the website. This can be achieved through various methods such as using a plugin, utilising Google Tag Manager, or directly editing the code.
By following these steps, you’ve successfully integrated your website with Google Analytics. Now, you can monitor your website’s performance and optimise it to enhance traffic.
Google Webmaster Tools Integration

Google Search Console is the free web service offered by Google for the publishers which helps them to make the site index to Google using it. Also, it helps to find if any issue exists there on the website and fix the same. Google Search Console will also let you know about the web pages which are performing well on Google. Here let’s see the step-by-step procedure to integrate webmasters on your website.
1. Sign into Google Search Console and then select on “Add a property”
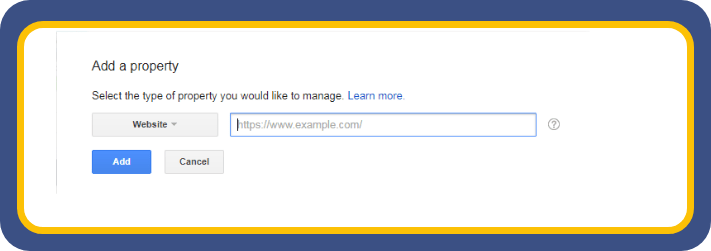
2. Add your site URL and click on continue. Now you will be taken to the site verification page.
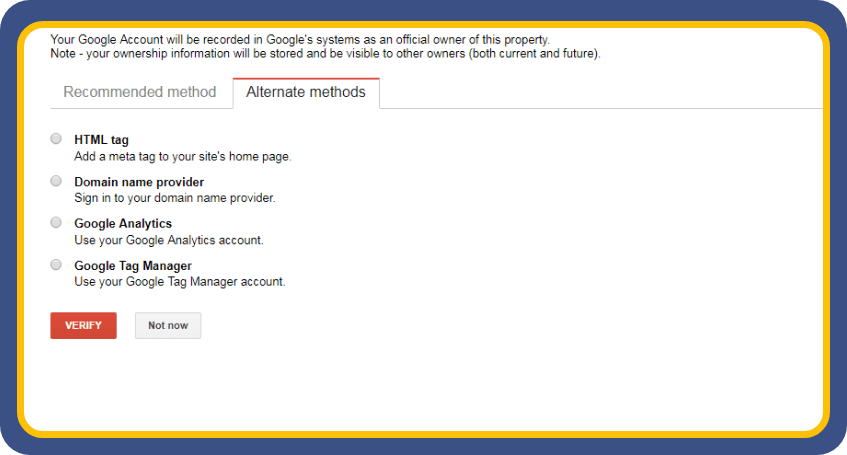
3. You can choose any of the methods and can verify the site. Here I will show the steps involved in verifying the site using the HTML tag.
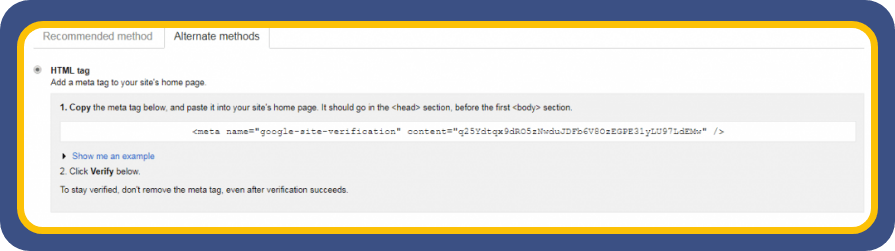
4. Just copy this code and add it to the header section of the Home page. And click on verify. Your site will be then verified by Google Webmasters.
Thus now the website is successfully integrated with the Google search console. You can now use this tool to index your brand-new website to Google.
Pages/Post Creation
Now the website is perfectly set up and ready for the contents to be added to the website. To add the content to the website you just need to login to the WordPress dashboard.
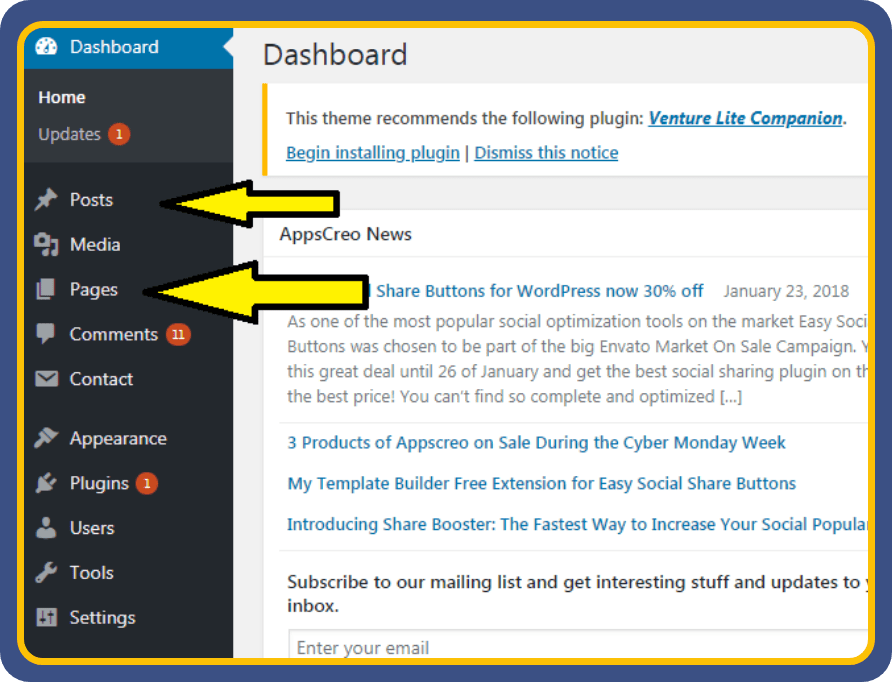
1.Log into the WordPress dashboard and then click on Posts/Pages from the left pane.
2. Click on “Add New” to create a new post. If you need to create a new page. follow the same procedure.
3. You will be taken to the real-time editor. Where you can add the title and update the contents. You can add as many text or media files in the content section.
4. Once you have updated the post with enough content you can just click on “Publish”. Now the post will be published on the site and it will be visible to all the users on the front end.
If you plan to publish the content on the page instead of post. The same procedure can be followed but in the starting step, you just need to click on “Add New” under the “Pages” section.
Basic SEO
Certainly, SEO (Search Engine Optimization) is the methodology that enables your blog or business website to secure a top position in Google’s organic search results. This, in turn, enhances the traffic directed to your business website. While the results from SEO efforts may take some time to manifest, the long-term benefits include a sustained increase in website traffic. Now, let’s explore the On-Page SEO techniques that can elevate your organic rankings on the Search Engine Results Pages (SERP).
On-Page SEO

Basically, SEO has two main divisions, one is On-Page optimization and the other is Off-Page optimization. On-page optimization includes all the changes and updates that are to be done within the website to improve the rankings on SERP. Whereas Off-Page optimization is just the opposite it, It involves all the offsite works like link building, social media activities, citation building, etc.
On-Page SEO – Title tag

The title tag is the blue color link which appears in the search results of Google when the user searches for any query. There are certain ways to optimize this title tag. The title tag on the website should not exceed 60 characters. The content which is more than 60 characters on the title is automatically trimmed by Google and will not be shown in the search results.
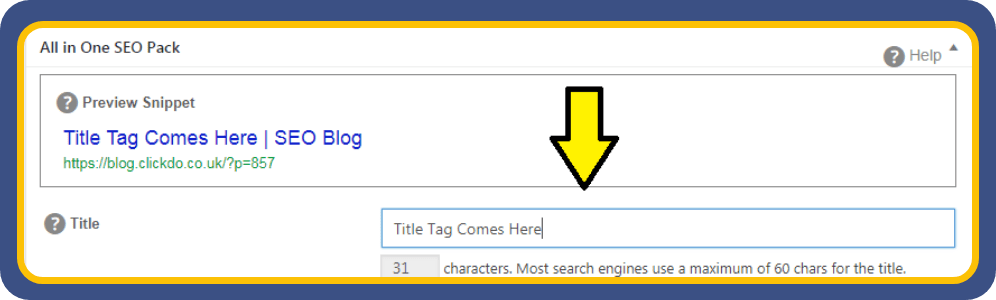
To optimize the title tags based on the posts try to add the target keyword in the title. This will help you to increase CTR as the user is searching for that particular keyword. You can simply add the title tag to your post or page by using the All in One SEO plugin or Yoast.
In this screenshot, I have mentioned the way by which you can add a title tag by using the All one SEO plugin. You can also see the live preview of how it will appear on SERP.
On Page SEO – Meta Description
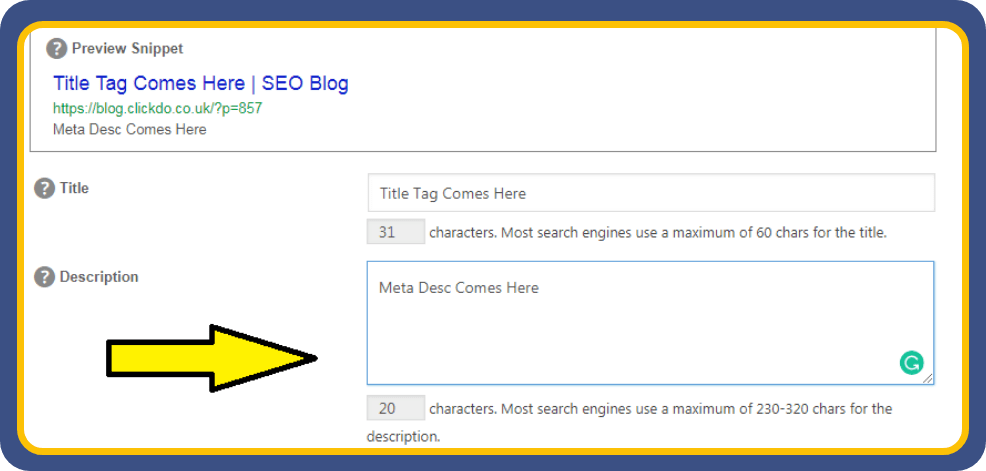
The meta description is the small piece of descriptive text which appears below the URL in the Search Engines Results Page. Previously Google was showing only 160 characters in the meta description area. But recently they have updated it to 320 characters. Now the users will read the description and will decide about the quality of the content present on the website.
Thus even some people may get the answer that they are looking for from the meta description itself. Thus overall it reduces the time of the users. When it comes to SEO, try to embed the keywords in the meta description and make it more catchy so that the users will click on it to visit your web page.
You can add the meta description to the post or page by either using the All one SEO plugin or the Yoast SEO plugin.
On Page SEO – Heading Tags

Heading tags are an important factor in On-Page SEO. Heading tags range from h1 to h6. Make sure you use a maximum of them in your content. Try to embed the target keywords in the heading tags to make Google understand what the content is actually about. Heading tags will also catch the eyeballs of the readers and will make them go through the content.
On Page SEO – Image Alt Text
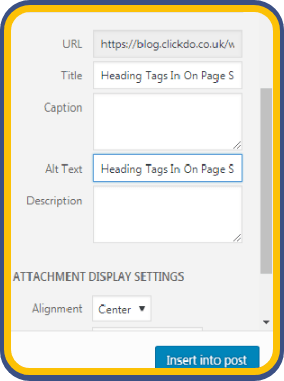
Image alt text is the one which you give to make Google realize what the image is all about. Even due to poor network if the image doesn’t load on the site, then this Alt text will appear in the place of the image and will let the user know about it. Giving more relevant alt text to the images will help you to improve the ranks on SERP.
You can add the alt text to the images while uploading them to the media library in WordPress.
On Page SEO – Content Writing Tips
Last but not least, content plays an important role on top of all this. Publish unique and fresh content on the website. Google loves to rank the web pages with the quality content. Add more media content like infographics and videos to make sure that user spends more time on your website once they land. Add long content on your website and avoid copying content from other sites. Also, avoid duplicate content within your website.
More internal links to the content will make the web crawler effectively index all the web pages on the site. Thus these are some of the On-page factors which will help you to get high rankings on SERP.
Once the On-Page SEO is done for your newly created blog, you must launch your blog to Google perfectly and you can learn the 12 Step WordPress SEO Guide
Now it comes to ranking your blog for vital keywords that can bring in traffic from Google as well as from social media. This can be done by doing off-site optimization, building backlinks, getting guest posts on other blogs for reference links, creating infographics and submitting them on infographic submission sites, citation building and much more.

You can learn it all online at our online WordPress SEO course for bloggers.

Thus by using this step-by-step guide on how to start a blog you can easily register a domain name at SeekaHost and start blogging.
5 Blog Writing Tips to grow your Blog
Once you have set up your blog, you need to know how to write compelling blog posts that convert. And you don’t just have to do it once. Every post you put up on your blog should be good enough to keep your audience engaged. After all, an engaged audience is key to a growing blog.
Even if you are not a writer by profession, you can write it right if you know what to do.
And here are five blog writing tips that you can follow to grow your blog –
1. Know Your Audience
When you are writing for people, you need to write what people want to read.
Do NOT go with guesswork. Make data-driven decisions. Keyword research tools like SEMrush, Google Adwords Planner, and Spyfu can help you identify the keywords that have been searched the most. This will help you choose more relevant topics.
Also, tools like Spyfu let you see the question-based queries that have the highest search volume. Make sure you answer those questions in your blog posts.
2. Write Compelling Headlines
No matter how much you try, people do judge books by their covers. And your audience will judge your content (even before reading it) by its headline.
Your headline should offer value to your user. It should be a teaser for what the content has in store. And it should have at least one of your main keywords for SEO purposes.
You can use tools like IsItWPs headline analyzer tool to get headline optimisation tips and suggestions.
3. Add Subheadings
There are three types of readers in the world.
- The Dedicated Readers. They read every word of the content, from start to finish.
- The Skippers. They read what interests them. If one statement doesn’t interest them, they will skip past it and go to the next section or paragraph.
- The Skimmers. They only read the subheadings and scan through the content without reading the whole piece.
To make sure Type 2 and Type 3 readers also get value from your content, you should use subheadings.
With creative and informative subheadings, you can also make the reading experience fun for Type 1 readers. When people enjoy reading your blogs and get the information they were looking for, they’ll keep coming back for more.
4. Keep Paragraphs Short and Sentence Length Variable
Your blog is not an academic text that readers have to go through compulsorily. Chances are, a hundred other blogs are offering the same content as yours. And your readers will go to others. That’s if you fail to keep them engaged.
The best way to keep them engaged is to keep your paragraphs short. Whenever you introduce a new idea, a unique point, or new lines of thought, change paragraphs.
Also, vary the length of your sentences. Short sentences keep things crisp. But it is the long sentences that keep the flow going. And you need to find the right balance between long and short sentences. Don’t overdo either type.
5. Add a Clear Call-to-Action
Once readers have read your blog, what do you want them to do? Leave a comment? Share your blog on social media? Buy a product? Avail a service? Whatever it is that you want them to do, ask them. With a simple call-to-action button.
However, do not confuse the reader. Remember, simplicity is the key.
Best Practices for Adding Images
When you are writing for the web, you need to understand that you have a lazy audience. And images offer more information in an easily digestible format than just text.
Words are important. But every now and then, you need an image too. And here are the best practices that you should follow –
- Use high-quality images. Keep the blur at bay.
- Use legal images. Make sure you either use royalty-free images, images that you own or you buy.
- Use screenshots. When you are explaining a process, you can use screenshots to make things clear. However, don’t take screenshots of copyrighted work.
- Use Infographics that you’re allowed to use. Adding random aesthetic images would do you no good. Understand the purpose of the image that you want to add. You can also create your own infographics if you wish.
- Optimise larger images to fit the screen. This is especially important when your audience will view your blog on mobile devices. Images that aren’t sized right do more harm than good.
- Add alternative tags. Images with the right alternative tags can also help you rank in image search, and your regular ranks also get a boost.
- Do not use images just for the sake of using it. Use images when they add some value to your words.
How often should you post Blogs?
The number one reason why people unsubscribe from a blog is if there is a flurry of posts too often. You don’t want your audience to be frustrated, right? But Huffington Post posts a blog every 58 seconds (and that is a 2013 statistics, now their daily number of blogs would have increased by a few hundred for sure).
How little is too little? And how much is too much? Answers to these questions in terms of the number of blog posts are subjective. How many times you should post depends on the end goal you want to achieve.
For most bloggers posting one to three blogs per week works fine. Just make sure the quality doesn’t dip. Multiple mediocre contents would give mediocre results only.
And you can calculate the number of blogs you should be ideally posting with this excellent guide by Neil Patel.
5 Best WordPress Themes for Your Blog
There are over 600 million blogs on the Internet. And if you are going to populate the blogging scene, you should make sure your blog stands out. Of course, your content needs to be unique, but you also need the right theme.
When it comes to choosing a WordPress theme, the biggest challenge is the choice. There are over 11,000 WordPress themes on ThemeForest alone. If you don’t want to waste time in trying multiple themes before you find the one, here are my top five picks
1. Newspaper

The Newspaper WordPress theme offers easy article and blog post creation, ideal for news, magazines, e-commerce, and more. With YouTube video support, AMP compatibility, RTL, and multi-language support, it’s fast, simple, and GDPR-compliant. Integrated with Instagram, bbPress, BuddyPress, and WooCommerce, it follows clean SEO practices and supports responsive Google Ads and AdSense. Perfect for cryptocurrency, fashion, lifestyle, travel, and various web development projects.
Price – $59
Ideal for – News blogs and magazines
Features
- Mobile optimised
- Implements SEO best practices
- Accelerated Mobile Pages (AMP)
- Loads fast
- Easy to customise
- A modern and sleek look
- Comes with a drag-and-drop editor
- You can add over 100 elements to a page.
2. CheerUp

CheerUp, a theme boasting luxurious design options, is crafted for excellence across various blogs and minimalistic magazines. With over 1000+ layout combinations, it offers modern aesthetics and versatility. Whether it’s a food blog, travel journal, fashion, health, lifestyle, or any magazine type, CheerUp ensures your content remains engaging. Elevate your blog experience – get CheerUp today!
Price – $69
Ideal for – Tech-savvy bloggers
Features
- 1000 layout variations available for 12 designs
- Allows adding a cover image on top of the blog
- AMP supported
- Optimised for search engines
- Highly responsive
Fast-loading
3. Kale Pro
Kale Pro is a versatile and elegant WordPress theme, perfect for food blogs or various purposes like lifestyle, parenting, or fashion. It features a clean design, and WooCommerce integration, and is optimised for search engines. With a special front page, multiple layouts, social media menus, and more, Kale offers flexibility. It can also be adapted for small business websites, showcasing services or portfolios. Backed by one-on-one support and an active team, Kale ensures a seamless setup for your blog or business.
Price – $35
Ideal for – Food Bloggers
Features
- WooCommerce integrations for bloggers who want to sell also
- Great for photo-centric blogs as it doesn’t clutter your blog but still displays images perfectly
- Multiple layouts, sidebar options, and multi-level menus
- Banners and sliders come with a colour overlay
With Kale, all your YouTube videos are automatically responsive
4. Stockholm

The Stockholm theme is a versatile and visually stunning WordPress theme, known for its modern design and robust features. With a sleek and intuitive interface, it caters to a variety of websites, from portfolios to business sites. Packed with customization options, responsive design, and seamless performance, Stockholm offers a premium user experience for your online presence.
Price – $39
Ideal for – For all categories
Features
- Modern, trendy and clean design
- Makes it very easy for your audience to engage with your content
- Easy to navigate through the blog,
- High customisation control without the need for coding or tech know-how
- Mobile responsive
5 . OceanWP
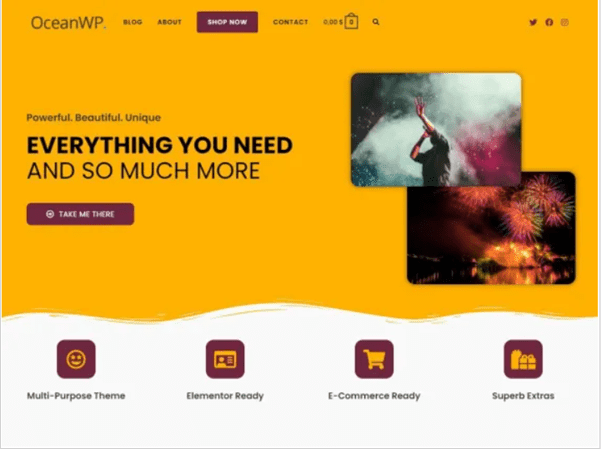
OceanWP, a powerful WordPress theme, boasts a plethora of features, including seamless integration with popular page builders, customizable layouts, and WooCommerce compatibility for e-commerce. It’s fast, responsive, and user-friendly. While the base theme is free, premium extensions are available, offering additional functionalities.
Price- OceanWP is available in free and premium versions. The OceanWP Pro Bundle, offering advanced features, starts at $43.
Ideal for – Blogs, E-commerce, and Business.
Features
- The versatile design is suitable for various websites.
- Using its page builder compatibility, it can be integrated seamlessly with popular page builders.
- Ideal for e-commerce sites.
- Ensures a mobile-friendly experience.
- Offers flexibility in pricing.
If you are not ready to pay for a theme yet, here are two bonus options that you can use for free –
1. Editorial
Ideal for – Editorial is ideal for bloggers who want to prioritise their best work and showcase content with featured images
Features
- Live editing feature
- Plenty of widgets for customisation
- Content organisation features for blogs with too many posts
- Comes with free support.
2. Hemingway
Ideal for – Hemingway is ideal for bloggers who want a hassle-free experience
Features
- Comes with a lot of white spaces
- Easy-to-use theme with minimum hassles
- Comes with a fancy parallax scrolling feature (this creates a depth effect as the foreground and background elements scroll at different speeds)
- Responsive theme
- Four different layouts for posting a blog
3 Best Blog Backup Solutions You Must Know
Human errors, faulty updates, and hacking can cause a loss of data. Your website data is always exposed to certain risks. And that’s where a complete backup comes to your aid. When you have a backup ready, you can restore your website with just one click.
But isn’t backup something that your hosting provider should be managing? Well, if you are just relying on your hosting provider, you are making a mistake.
What if your hosting provider has a server fail? What if something goes wrong at their end? What if their server gets hacked?
You need to have your own backups in place.
Here are the top 3 backup plugins you can use for your WordPress blog:
1. Jetpack Backup
The Jetpack plugin is free but offers additional paid commercial upgrades. Your blog is automatically backed up once every day.
2. UpdraftPlus Backup and Restoration
A free Lite plan and a premium plan are available. UpdraftPlus Backup and Restoration also offer cloning and migration options.
3. ManageWP
Take a backup of your blog every 24 hours. The best part about ManageWP is that it doesn’t slow down your website while taking backups. It is quick as it creates backups of only the files that have changed and uploads them to the designated storage.
3 things to do to grow your blog traffic
What good is a blog if people aren’t coming your way? You have tried a lot of SEO tricks, and yet nothing seems to work.
Don’t kill your blog too soon. Try a 90-day plan.
Here are the three things you need to do in these 90 days to get a guaranteed increase in your traffic –
1. Create Viral Content
Okay, it is easier said than done, but hear me out. All you need to go viral is to evoke emotions. Fear, happiness, sadness, envy, fury – anything will do. Make your headline emotional. Don’t stay stuck in the neutral middle ground.
2. Create Evergreen Content
It might sound counterintuitive, but your viral content needs to be evergreen too. Stuff that people can keep coming back to.
How to do that? Long-form content is your best bet.
When you have a long enough blog, you can target a lot of keywords with ease; you can add a lot of information and assert your presence as an authority on the subject matter. And your content becomes a knowledge resource.
When your content is valuable for the reader, search engine crawlers will pick up the hint and rank your content higher. And that begins a cyclic reaction of higher traffic.
3. Get Referral Traffic
Guest posts that allow you to add backlinks to your blog are a good way to start. If you are up for the challenge, you can also write a Kindle e-Book and add the link to your blog in the eBook to drive home more traffic.
Remember that blogging is not a quick fix. It is a plant that you have to nurture with quality content and audience engagement.
Don’t hesitate in giving your blog some time to grow. Keep your efforts constant.
Top 7 Ways to Earn from a Blog
Humans are shallow. Most of what we do is to get something in exchange. All the efforts that you put in your blog should give you returns, right?
And money is the obvious and primary way in which you’d want to be remunerated for your efforts, right?
Here are seven simple ways to start earning from your blog –
1. Get Paid for Ad Space

The simplest way to make money from your blog by letting others place ads on your blog. You can use Google Adsense, Media.net, or PopAds to place an advertisement on your blog. You can either get paid for every click that the ad gets from your blog (Pay-per-click), or you can get paid for every 1000 or so impressions (Cost per Impression).
2. Join an Affiliate Program

You can write content promoting a certain product or service and add affiliate links in your blog. Every time someone clicks an affiliate link on your blog, you get paid. Amazon’s affiliate program is a great way to get started.
3. Blogging Services

If your blog becomes successful, you can charge others to write blogs for them. While you may not always get credit for your content, it does bring in a good enough amount of cash.
4. Directly Sell Products or Services

Just like affiliate programs, you can even directly sell products or services on your blog. You can either sell someone else’s offerings. Or you can also sell your own services or any products that you might want to sell.
5. Create a Membership Model

If the content you create is valuable to a particular audience, you can create a subscription-based membership model. In this model, only those who subscribe to your blog (by paying a fee) will have access to certain content that you create.
6. Sell Digital Products

Did you just spend hours curating information about a certain topic? Instead of just posting that information in a series of blogs, you can publish an eBook on that topic. And then you can sell that eBook on your blog.
7. Create a Business Directory

Do your readers often ask you for recommendations? Instead of recommending other businesses in your niche for free, contact them to sign up for a business directory. Suppose you have a wedding blog. Create a directory of related suppliers. Photographers, caterers, florists, wedding bands and wedding venue owners will readily pay to be listed as a recommended partner if your blog has the required authority.
Now, that you have all the information you need to create, grow, and earn from your blog, get your domain registered at SeekaHost and start your blogging career today.
Closing Thoughts
There are many ways to make money from blogging like banner ads, affiliate marketing, niche edits, selling guest posts and many more. As a blogger, you need to be more consistent with your work and you will get the best out of it in return. So don’t wait anymore, just create a new account on the SeekaHost.app and get your first blog website created now.
You can also find more tutorials and guides about a blogging business and how to earn from blogging at SeekaHost Blog.
You can implement these strategies while building your blog and start making money from blogging. Blogging will be one of the best growing niches in the future.
The great thing about having a blog is it can be about anything in the world you find dear to your heart. It’s also not limited to businesses but everyone under the sun from lawyers, practitioners, dentists, landscapers, philosophers, plant and animal lovers can blog. People of all walks of life have the opportunity to bring their two cents to the world and I think this is very important for humanity.
The great thing about the internet is that we all have access to the information that interests us at the click of a button. But without personal blog owners around the world, this would seriously impact the way we all share and learn. It’s not all about making money online as some may want to create a blog that raises awareness about a major issue, help a community or even share some of their life knowledge.
The benefits of blogging are therefore multifold and the beauty of it is that you just don’t know how impactful it can be. Just see how the moneysavingexpert.com website has established its blog founder as a finance expert in the UK who runs his own TV shows.
Author Profile
- Blogger and Educator by Passion | Senior Online Media & PR Strategist at ClickDo Ltd. | Contributor to many Business Blogs in the United Kingdom | Fascinated to Write Blogs in News & Education I have completed a journalism summer course at the London School of Journalism and manage various blogs.
Latest entries
 Business TipsJune 2, 2025DevOps for Digital Entrepreneurs: Automating Your Online Business from the Backend
 SEOMay 13, 2025How Your Hosting Speed Impacts Google Rankings and SEO Performance
 Online Business TipsApril 28, 202515 Easy Ways to Make Money Online in Germany
 Digital MarketingApril 10, 2025What Is Domain Authority and How to Improve It