How to Install WordPress using Softaculous for CPanel Beginners?
In today’s blog, we have about have a quick knowledge sharing on how to install wordpress with cPanel. Now, most cPanels comes with the Softaculous auto installer, which is a piece of software that automatically helps you set up and install a lot of different third-party platforms, one among those platforms is WordPress.
Basic Steps to install WordPress using Softaculous:
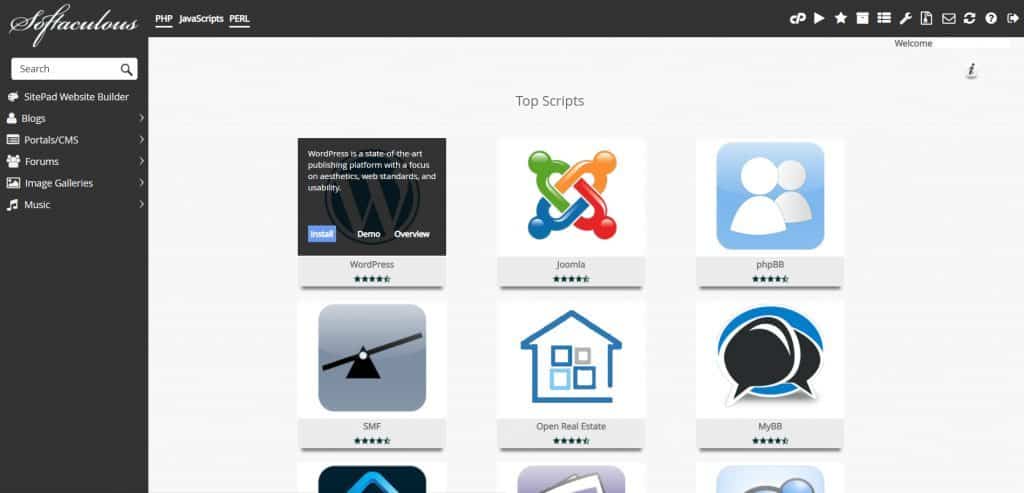
The first thing that we need to do is login to your cPanel. This might be slightly different depending on which hosting company that you are using. In this example, we’ll use SeekaHost, but your cPanel once you log into it should look very similar to this one the first step is we’re going to look for auto installers and we’re going to find Softaculous go ahead and click on that now you might see WordPress right away as one of the top scripts to install.
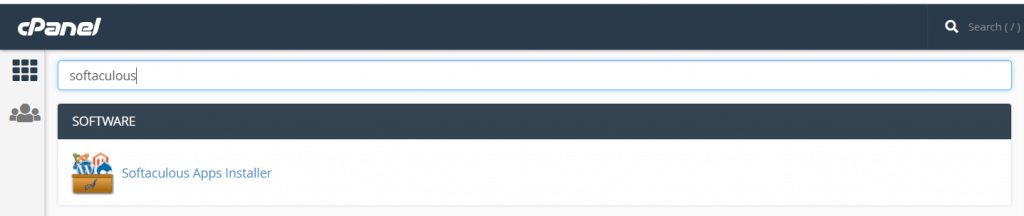
If you don’t see it right there on the first page, you can come up to search bar and search for WordPress and it should take you right to the WordPress software. From there you can click on the blue install button before we finish the installation of WordPress.
We just have to go through a few actions and provide a little bit more information choosing your protocol. If your site already is going to be using SSL, then you can go ahead and set this to use either HTTP or HTTPS with the W’s. Yet, there’s really not a strong case one way or the other I prefer to go without W’s because there really isn’t any benefit if your site is not using an SSL certificate then you can leave this to just regular HTTP.
However, I would HIGHLY advise that you do use an SSL certificate and choose your HTTPS here and this option for your domain you should have a list of all of the domains that are added in your cPanel for this specific instance we only have one you may have a few just choose the domain name that you want to use directory we’re just going to leave that blank and install WordPress.
Directory, Database, Plugins and Additional Settings:
In the default, home directory site name just gives your website a name usually this is your business or a company name for the description you can add in an optional tagline here if you have one or simply just leave a blank check this box right here if you want to enable multi-site for us.

We’re gonna leave it unchecked and just do a regular WordPress install the admin account this is actually what we’ll use to log into WordPress. So, go ahead and create an admin username then give yourself a password and also put in an admin email address. Next up, choose your language then you have the option to install one of two plugins that SeekaHost is recommending here.
However, there is really no need to install either one right now you can always install plugins later. Once you’ve finished installing WordPress so I like to just leave these two unchecked and install plugins.
I like to leave this to set condone and we’ll install some themes on our own once WordPress is installed. The final piece is some Advanced Options you can leave these to their default as what they are currently set at I like to make a couple of changes to these two options.
One thing I like to do here with the database name is I try to put something that more closely resembles the name of my site or the domain that I’m using. I’m going to use organize as the database name table prefix some people will tell you from a security standpoint that it’s good not to use WP underscore. However, that doesn’t really provide much of a security benefit and for the sake of if we ever need to move this site in the future and just to keep things a little bit simpler.
I like to choose the default table prefix for our database backup location we’re just going to leave that set to default and then the final step to installing WordPress is to click the install button. You’ll see some information here that cPanel is just checking all of the information you provided and they’re setting things up for you. So this could take just a minute or two in my case it took about 15 to 20 seconds and everything was installed successfully and we’re all ready to go so this page also presents us with the domain name of our website as well as the administration URL for logging in and managing our site and that’s all there is to installing WordPress with cPanel.
If you would like to buy web hosting and need all this assistance from the support team of the web hosting providers, choose SeekaHost – The UK’s Super Fast Web Hosting company, who will help you in all the aspects.
Author Profile
- Technical Support Consultant at SeekaHost. Learning is an Attitude, Hope My Blogs Be One Among, You Assimilate.
Latest entries
 Website SpeedJune 15, 2021The 5 Best Website Speed Test Tool: Analysis and Their Features
 Web HostingApril 26, 2021Major updates in Plesk Obsidian 18.0.35 for better user experience (and some are big!)
 Digital NomadFebruary 18, 2020Travel full-time and Make Money Online as Digital Nomad
 WordPressJanuary 8, 2019How to Install WordPress using Softaculous for CPanel Beginners?